I LOVE a beautiful, bold red lip! There’s just something about putting on red lipstick that makes you feel a little more confident, polished, and put together. But if you’re over 40, you might have noticed that wearing red lipstick isn’t quite as easy as it used to be.
Maybe your lipstick starts bleeding into those tiny lines around your mouth. Maybe it feathers outside your lip line, or your lips feel dry and look more textured than you’d like. And let’s be real, nobody wants to spend the evening wondering if their lipstick has migrated halfway up their face!
The good news? You absolutely CAN wear beautiful red lipstick after 40!
As a licensed esthetician and certified makeup artist, I love helping women find makeup techniques that work with their changing skin. And when it comes to red lipstick for mature lips, I’ve found that three things make all the difference:
- Choosing the RIGHT shade of red for your skin tone.
- Using a good, long-lasting lip liner.
- Finding a comfortable, hydrating lipstick that wears beautifully.
I’m sharing my favorite three-product combination and exactly how I apply it to help prevent lipstick from feathering or bleeding into fine lines. And if you’re more of a visual learner, I’ve created a coordinating YouTube tutorial so you can watch me do the entire look!
WATCH MY RED LIPSTICK TUTORIAL
Why Does Lipstick Bleed Into Wrinkles as We Age?
If you’ve noticed your lipstick feathering more than it used to, you’re not imagining things! As we age, our skin naturally produces less collagen and elastin, and the delicate skin around our lips can develop fine lines. Our lips may also become drier and lose some of their natural fullness and definition.
These changes can make it easier for lipstick, especially creamy formulas, to travel beyond the natural lip line. And bold colors like red make it even more noticeable! But here’s what I want you to remember: You don’t have to give up red lipstick just because you’re getting older. You just need to adjust your technique! A few small changes can make a BIG difference.
Step 1: Find the Best Shade of Red Lipstick for Your Skin Tone
Before we even talk about lip liner or lipstick application, let’s talk about COLOR. Because this is one of the biggest mistakes I see women make when choosing a bold red lip.
You can have the most perfect lipstick application in the world, but if you’re wearing a shade of red that doesn’t flatter your coloring, you probably won’t love the result.
And when you don’t love the way a color looks on you, it’s easy to assume you just can’t pull off red lipstick. But that’s not true! You just haven’t found YOUR red.
Cool-Toned Red Lipstick vs. Warm-Toned Red Lipstick
Red lipstick comes in so many different shades, and understanding your skin’s undertone can help you narrow down your options.
If you have cool undertones:
Look for blue-based reds, berry reds, cranberry, raspberry, and cooler cherry shades.
If you have warm undertones:
You may love orange-based reds, tomato reds, coral reds, and warm brick shades.
If you have neutral undertones:
You may be able to wear a wide range of reds, depending on their depth and intensity.
These are guidelines, not rules. Your overall coloring, contrast, and personal preferences matter too!
Why I Choose Berry Red Lipstick
I have a cool skin tone and fall into the Summer seasonal color palette. That means cooler, softer colors tend to be more flattering on me than warm, orange-based shades. I’ve learned that I look SO much better in a berry red than a bright orange-red lipstick.
A beautiful berry red complements my natural coloring and makes my whole makeup look feel more balanced. So before you give up on red lipstick, experiment with different undertones!
Finding the right red can completely change how you feel about wearing a bold lip. Use Chat GPT or Claude to help you find your perfect red lip!

Step 2: Prep Your Lips for a Smooth, Hydrated Finish
One of the keys to making red lipstick look beautiful on mature lips is starting with a smooth, hydrated surface. Dry, flaky lips can make lipstick apply unevenly and draw attention to texture.
Here’s what I recommend:
- Gently remove loose, flaky skin with a damp washcloth if needed. Don’t aggressively scrub.
- Apply a hydrating lip balm while you’re doing the rest of your makeup.
- Allow the balm to absorb.
- Blot away any excess before applying lip liner.
That last step is important!
We want hydrated lips, but we don’t want them so slippery that our lip liner can’t grip. A smooth, comfortable base helps your lipstick apply more evenly and look beautiful.
Step 3: Use a Long-Lasting Lip Liner to Prevent Feathering and Bleeding
Okay, THIS is where the magic happens!
If you’re struggling with lipstick bleeding into wrinkles, a good lip liner is one of the most important products you can use. In fact, I would argue that when you’re wearing a bold red lip, your lip liner is just as important as your lipstick.
Why? Because it helps create a defined boundary for your lipstick. It also helps you establish a beautiful lip shape, especially if your natural lip line has become a little less defined over time. And when you’re wearing a bold color like red, that definition makes all the difference!
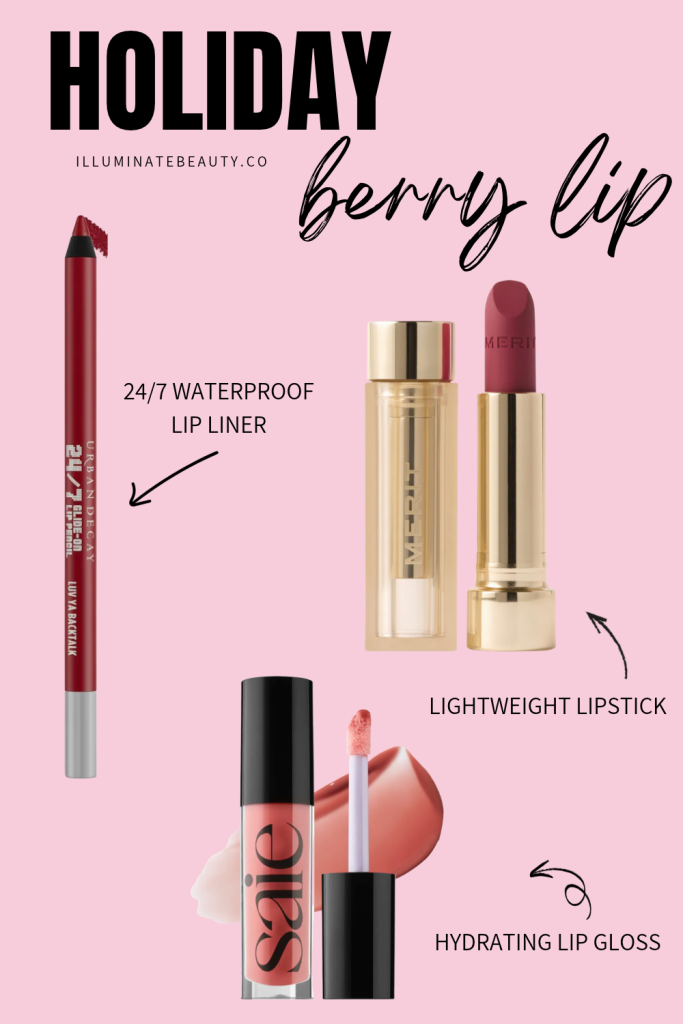
My Favorite: Urban Decay 24/7 Glide-On Waterproof Lip Liner
I searched HIGH and LOW for a good lip liner. I wanted something that would glide on smoothly without tugging at my lips, but also have serious staying power.
After researching different options and reading reviews, I decided to try the Urban Decay 24/7 Glide-On Waterproof Lip Liner.
And I love how it works with this lip combination! It’s a creamy, waterproof lip pencil designed to provide long-lasting color and definition. Urban Decay advertises up to 16 hours of wear, although your actual results will depend on your application, meals, and other factors. The formula also contains conditioning ingredients, including vitamin E and jojoba oil.
How to Apply Lip Liner to Mature Lips
Here’s the technique I recommend:
1. Define your bottom lip.
Start in the center and work outward toward the corners.
2. Outline just short of the corners of your mouth.
Rather than trying to draw one long, continuous line, use short strokes to follow your natural lip shape.
3. Connect the lines.
Carefully trace your natural lip border, keeping the shape balanced.
4. Line your cupid’s bow.
Use small, controlled strokes to define the center of your upper lip.
5. Lightly fill in your lips with the liner.
This is one of my favorite tricks! Instead of using lip liner only around the edges, I like to bring the color slightly inward or fill in more of the lip.
It creates a base underneath your lipstick and can help the color wear more evenly as the lipstick gradually fades.
MY BIGGEST TIP: Don’t overline your lips too dramatically, especially near fine lines around your mouth. A tiny adjustment can enhance your lip shape, but drawing too far outside your natural lip border can make feathering more noticeable. The goal is beautifully defined lips that still look like YOUR lips!
Step 4: Apply a Hydrating Red Lipstick That Feels Comfortable
Now that we’ve created a beautiful lip shape with liner, it’s time for the lipstick! When I started searching for the perfect red lipstick, I had a few things on my wish list.
I wanted something that:
- Came from a brand with a thoughtful approach to ingredients.
- Felt hydrating and comfortable.
- Had beautiful color payoff.
- Wore well throughout the day.
- Didn’t make my lips look or feel dry.
Because I don’t care how beautiful a lipstick looks when you first apply it. If it makes my lips feel dry and uncomfortable an hour later, I’m not going to want to wear it!
My Pick: MERIT Beauty Signature Lipstick
I chose the MERIT Beauty Signature Lipstick because I love the brand’s approach to simple, wearable beauty. It’s a lightweight, buildable lipstick designed to feel comfortable rather than heavy on your lips.
MERIT offers both satin and matte finishes, with different ingredients and textures depending on the formula. The satin version features moisturizing ingredients such as plant-derived squalane and sunflower seed oil. I love the idea of wearing a beautiful bold lip without sacrificing comfort!
How I Apply My Red Lipstick
Once my lip liner is in place, I apply the lipstick inside the shape I’ve created. I like to start with a thin, even layer rather than applying too much product all at once.
Then I gently press my lips together and check the edges. If I want more intensity, I build the color gradually. You can also lightly blot with a tissue and add another thin layer to help reduce excess product.
Remember: More lipstick doesn’t necessarily mean longer wear!
Too much product can make it easier for the color to transfer or migrate. Thin, controlled layers are usually a better approach.
Step 5: Add a Little Gloss for Fuller-Looking, Hydrated Lips
Now, you could absolutely stop with the lipstick. A beautiful red lip with a defined liner looks gorgeous on its own! But sometimes I want a little extra shine. And that’s where my third product comes in.
My Pick: Saie Glossybounce High-Shine Hydrating Lip Gloss Oil
I chose the Saie Glossybounce High-Shine Hydrating Lip Gloss Oil because I wanted something that looked beautiful on its own but could also be layered over lipstick.
It’s a gloss-oil hybrid designed to provide shine and moisture without a heavy, sticky feeling. The formula contains ingredients such as hyaluronic acid, jojoba oil, and shea butter. I love that it gives my lips a pretty, glossy finish while keeping them feeling comfortable.
My Trick for Applying Gloss Over Red Lipstick
Here’s something important:
Don’t apply a thick layer of gloss all the way to the edges of your lips!
When you’re trying to prevent lipstick feathering, too much slippery product near the lip line can work against you. Instead, I recommend dabbing a small amount of gloss onto the center of your lips.
Then gently press your lips together to distribute it. This adds a beautiful shine and can help your lips appear fuller without disturbing the carefully defined edges. It’s such a simple trick, but it makes a difference! And if you prefer a softer, everyday look, this gloss is also beautiful worn on its own.
How to Make Red Lipstick Last Through Eating and Drinking
One of the biggest concerns women have about wearing red lipstick is how well it will hold up throughout the day. Especially during the holidays!
Between eating, drinking, talking, laughing, and spending time with family and friends, we want our lipstick to stay looking beautiful for as long as possible.
And that’s exactly why I love this three-product combination.
The waterproof lip liner helps create a longer-wearing base and defined edges.
The MERIT lipstick adds beautiful color while keeping my lips feeling comfortable.
And the Saie gloss gives me the option of adding a little extra shine and hydration.
Here are my best tips for making your red lipstick last longer:
- Start with clean, smooth lips.
- Blot excess lip balm before applying your liner.
- Outline and lightly fill in your lips with a long-lasting lip liner.
- Apply lipstick in thin layers.
- Blot gently to remove excess product.
- Keep gloss concentrated toward the center of your lips.
- Bring your lipstick along for quick touch-ups after meals.
No traditional creamy lipstick and gloss combination is completely transfer-proof, especially when eating oily foods. But with the right preparation and application, you can help your red lip stay beautifully defined for hours. And most importantly, you can enjoy yourself without constantly worrying about your makeup!
Common Red Lipstick Mistakes to Avoid After 40
If you’ve struggled to make red lipstick look flattering on mature lips, here are a few mistakes worth avoiding.
Mistake #1: Choosing the Wrong Undertone
A red that clashes with your natural coloring can make the entire look feel off. Experiment with cool, warm, and neutral reds to find your most flattering shade.
Mistake #2: Skipping Lip Liner
Lip liner can help define the lip shape and reduce the appearance of feathering. It’s especially helpful when you’re wearing a bold color.
Mistake #3: Applying Too Much Lipstick
Thick layers can feel heavy, transfer more easily, and settle into texture. Start with less and build as needed.
Mistake #4: Putting Gloss All the Way to the Lip Line
Too much gloss around the edges can encourage lipstick to move. Keep the shine concentrated toward the center of your lips.
Mistake #5: Thinking You’re Too Old for Red Lipstick
This might be the biggest mistake of all! There is NO age limit on wearing a beautiful red lip! You don’t have to give up bold colors because you’re in your 40s, 50s, 60s, or beyond. Sometimes you just need a different shade, a better formula, or a few new application techniques.
Watch My Red Lipstick Tutorial for Women Over 40
Want to see exactly how I create this look?
I filmed a step-by-step YouTube tutorial showing how I choose my red lipstick, define my lips with liner, and finish with a beautiful hydrating gloss.
I’ll walk you through the technique so you can recreate it at home!
And if you enjoy makeup tutorials specifically for women over 40, make sure to subscribe to my YouTube channel for more mature skin makeup tips, skincare advice, and honest beauty product reviews.
Frequently Asked Questions About Red Lipstick for Mature Lips
- What is the best red lipstick for mature lips? Look for a red lipstick with a flattering undertone, comfortable texture, and buildable color. I love the MERIT Beauty Signature Lipstick because it’s lightweight and designed to feel comfortable on the lips.
- How do you stop lipstick from bleeding into wrinkles? Start with smooth, hydrated lips, remove excess balm, and use a long-lasting lip liner to define your natural lip shape. Filling in your lips with liner can also help create a more even base for your lipstick. Avoid applying too much slippery product near the edges.
- Should women over 40 wear matte or glossy lipstick? Both can look beautiful! Matte formulas can provide more defined color, while satin and glossy finishes can make lips look smoother and more hydrated. Choose the finish that feels best on your lips, and use gloss strategically if feathering is a concern.
- What color red lipstick looks best on cool skin tones? Blue-based reds, berry reds, cranberry, and raspberry shades are often flattering on cool skin tones. I personally prefer berry reds because I have cool undertones and a Summer color palette.
- Does lip liner really prevent lipstick feathering? A good lip liner can help create a defined boundary and reduce lipstick migration, although it can’t guarantee zero feathering. I especially like long-wearing, waterproof formulas when wearing bold red lipstick.
- Can you wear red lipstick if you have thin lips? Absolutely! Choose a flattering shade, carefully define your natural lip line, and consider adding a small amount of gloss to the center of your lips for a fuller-looking finish.
Final Thoughts: You Can Absolutely Rock a Red Lip After 40!
If there’s one thing I want you to take away from this tutorial, it’s this:
You are NOT too old to wear red lipstick!
I think a beautiful red lip can be one of the easiest ways to make your makeup feel a little more polished, feminine, and confident. And you don’t need a complicated routine to get it right.
Find a flattering shade. Use a good lip liner. Choose a comfortable lipstick. And add a little gloss if you love that extra shine!
Here are the three products I use to create this look:
My Red Lip Essentials:
- Urban Decay 24/7 Glide-On Waterproof Lip Liner
- MERIT Beauty Signature Lipstick
- Saie Glossybounce High-Shine Hydrating Lip Gloss Oil
As a makeup artist, I want women to know that getting older doesn’t mean you have to stop having fun with makeup. Sometimes a little color is exactly what you need to feel beautiful and confident! Because you weren’t made to fade.
Have you tried Thrive mascara? I’d love to hear what you think! Leave me a comment below and tell me your favorite mascara. Because when you feel good in your skin, you do good. And sometimes a great mascara is the perfect finishing touch!


Here are other blogposts you might enjoy:
- Fall Makeup for Mature Skin: Easy Cream Makeup Tips for a Polished Glow
- The 3 Best Foundations for Women Over 40: Lightweight, Hydrating & Never Cakey
- The 3 Best Concealers for Women Over 40 That Don’t Crease
- How to Make Mature Eyes Look Bigger: Eyeliner & Eyeshadow Tricks for Women Over 40
- Best Beauty Devices for Mature Skin: Red Light, Laser, Gua Sha, and More
- My Honest Review of Thrive Causemetics Mascara: Is It Worth It?

About the Author
JoEllen is a licensed aesthetician, certified makeup artist, and certified John Maxwell coach, speaker, and trainer. She works with women helping them look and feel confident. She loves teaching women simple beauty techniques so they can feel empowered to try it at home. Her motto is that when you look and feel good, you do good!

*This post contains affiliate links. If you choose to purchase an item featured, I receive a small portion from the sale. Thank you! It does not affect you at all.

